Graphical User Interface
This is a detailed reference guide for Audio Tuner’s GUI.

The main GUI, using the Qt port of the Adwaita-dark theme and the Tango icon theme.
Starting
Start the GUI by running tuner-gui. If you start it from a command line,
you can change the defaults for various options by passing arguments. You can
also give it files to immediately analyze on startup, just like the CLI
version. See the man page for details.
Toolbar

From left to right:
Option Panel/File Selector Panel toggle button
Switches between the Option Panel and the File Selector Panel. The icon shown on the button represents what you’ll get if you push it, not what is currently shown.
Keyboard shortcut: F2
Message log button
Opens the Message log window. The icon will change to alert you if there’s any error messages in the log you haven’t seen yet.
Play button
Begins playing audio. What gets played depends on what is selected in the Analyzed Audio Panel, and what’s in the Playlist.
Pause button
Pauses and unpauses the player.
Stop button
Stops the player and unloads the audio.
Previous button
Added in version 0.12.
Goes to the previous entry in the playlist.
Skip back button
Backs up 10 seconds. If Option ‣ Play between Start time and End time is selected, this won’t put the play position before Start time (see Option Panel).
Skip forward button
Jumps forward 10 seconds. If Option ‣ Play between Start time and End time is selected, this won’t put the play position after End time (see Option Panel).
Next button
Added in version 0.12.
Goes to the next entry in the playlist.
Play position
Displays the time from the beginning of the audio in minutes and seconds. The rate at which this increases is affected by tempo correction, so this may not reflect the actual amount of time passed since the beginning of the audio.
Play position slider
Shows the play position from Start time to End time. You can click and drag it to change the position.
Time remaining
Displays the time to the end of the audio in minutes and seconds. The rate at which this decreases is affected by tempo correction, so this may not reflect the actual amount of time until the end of the audio.
Now Playing
A label that shows the title of the audio loaded into the player.
Exit
Exits Audio Tuner.
Display
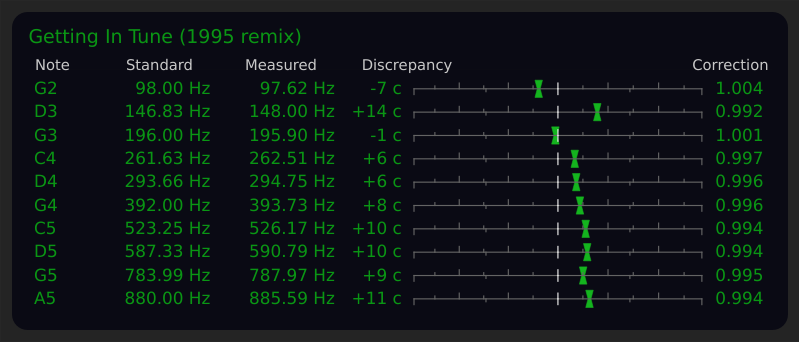
The Display displays information about the most prominent pitches in the audio.
Lower pitches are on top and higher pitches are on the bottom, to maintain consistency with the output of the CLI front end. There may be an option in a future version to reverse this.
If there’s not enough room to show everything at once, a thin green scroll bar will appear on the right. You can scroll around using the scroll bar, the mouse wheel, or by clicking and dragging in the main display area. You can even use the Up, Down, PgUp or PgDn keys if the Display has keyboard focus.
Note
This column shows which note in the selected tuning system the pitch is closest to. (It’s not necessarily the note it’s supposed to be, since sometimes audio is so far off it ends up in a completely different key!)
Standard
This column shows the ideal frequency of the note in the selected tuning system.
Measured
This column shows the actual frequency of the pitch in the audio with pitch correction applied. (If no pitch correction has been applied yet, it shows the original frequency unmodified.)
Discrepancy
This column shows the discrepancy between the frequencies shown in the Standard and Measured columns.
The number on the left is the discrepancy in cents.
The meters range from -50 c to 50 c. A needle left of center means the pitch is too flat, and a needle right of center means the pitch is too sharp.
There’s a tick mark on the bottom of the line every 25 c, while each tick mark on top of the line represents an increment of .005 in the frequency ratio (or .01 if you only count the major tick marks).
Correction
This column shows the pitch correction factor needed to center the needle.
Note
This does NOT show the correction that has been applied. In other words, “Correction” is short for “This is what correction is needed”, not “Here’s the correction factor you applied”.
Quick Tuner

Added in version 0.12.
The Quick Tuner shows the pitch correction applied to the currently selected analyzed audio, and is a convenient way to adjust it. It doesn’t do anything you can’t already do with the Option Panel; it’s purely there for convenience.
The box with the number and the little up and down buttons changes pitch in 100 cent increments, which corresponds to a key change in the 12 Tone Equal Temperament system. The slider can be dragged with the mouse for fine adjustment.
Any change is applied to the currently selected analyzed audio immediately. There’s no need to push an apply button like in the Option Panel.
Note
Tempo is adjusted along with pitch by default. To adjust pitch only, turn off the Link button in the Option Panel and apply the change. Note that Link is not a global setting. Each item in the Analyzed Audio Panel has it’s own Link setting, and doing this will only change the currently selected one.
File Selector Panel
This can be navigated with either the keyboard or the mouse.
Hint
The way you navigate, highlight and select things here pretty much works the same as a standard GUI file manager.
Hint
You can also select files for analysis by dragging them from a file manager and dropping them anywhere on the Audio Tuner main window. This means you don’t even need to use the File Selector Panel at all if you don’t want to.
Hint
Dropping a directory onto Audio Tuner causes the File Selector Panel to go to that directory.
To select things, either double click on them or press Enter once they’re highlighted.
You can move up and down with the arrow keys. Hold down Shift while doing that to highlight a range of things.
You can also highlight a range of things by dragging with the mouse.
Hold down Ctrl while clicking things to highlight multiple non-contiguous things.
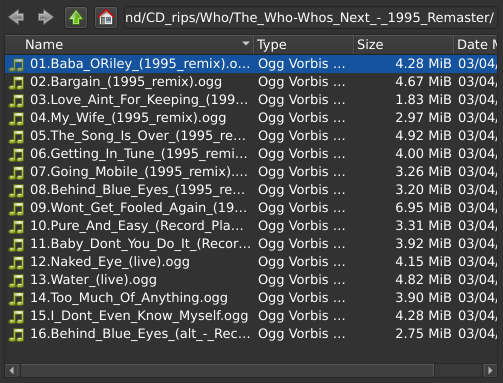
Selecting a file or files will cause them to be analyzed. The ones for which analysis is successful will appear in the Analyzed Audio Panel. While analysis is happening, a progress bar and a stop button appears in the status bar (at the bottom of the window).
Selecting a file which has already been analyzed will cause it to be selected in the Analyzed Audio Panel.
Select a directory to go to that directory.
Selecting multiple directories at once does nothing.
The File Selector Panel has its own little toolbar. Here’s what’s on it, from left to right:
Back button
Go to the previous directory in the navigation history. The status bar will tell you specifically which directory that is when you hover the mouse cursor over the button.
Forward button
Go to the next directory in the navigation history. The status bar will tell you specifically which directory that is when you hover the mouse cursor over the button.
Up button
Go to the parent directory.
Home button
Go to your home directory.
Path
Shows the current directory. You can edit it to change directories. You can also add a filename to the end of the path to select that file for analysis. It includes autocomplete functionality so you don’t have to type out entire directory or file names.
Option Panel
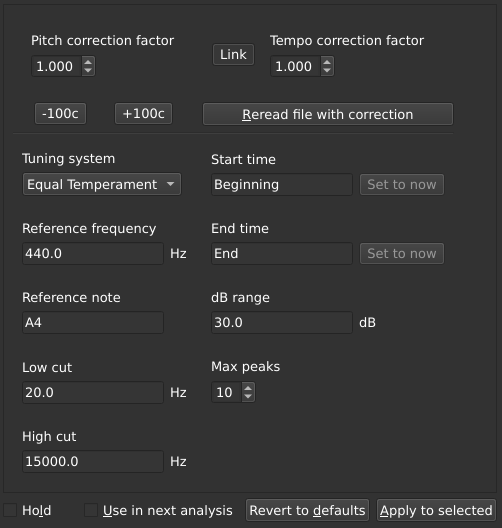
If the Option Panel is not visible, you can toggle it by pressing F2, using the Option Panel/File Selector Panel toggle button in the toolbar, or by using the Options ‣ Show option panel menu option.
The Option Panel has two jobs:
It’s where you set options that you want to be applied, either to the next analysis or to the currently selected analyzed audio.
It shows you the options that are currently applied to the selected analyzed audio.
Doing two jobs at once can be confusing, so there’s some controls to help you manage things:
Hold
If Hold is checked, the Option Panel will hold on to whatever options you have set in it.
If Hold is unchecked, selecting something in the Analyzed Audio Panel will show the options associated with the selection in the Option Panel.
Use in next analysis
Added in version 0.11.
If Use in next analysis is checked, the next file you select for analysis in the File Selector Panel will use the options currently set in the Option Panel.
If Use in next analysis is unchecked, the next file you select for analysis will use the default options, or it’s own saved options if there are any.
Note
Checking the Use in next analysis box will automatically check the Hold box, to prevent the options you set from getting accidentally clobbered.
There’s also some important buttons:
Revert to defaults
Makes everything in the option panel revert to its default value.
Apply to selected
Applies the settings in the option panel to what’s currently selected in the Analyzed Audio Panel.
If you try to apply an invalid value, the offending text box will turn red to attract your attention to the problem.
The Options
Tip
On any option where you can type in a value, setting it to an empty value will cause it to set itself back to the default.
Tip
In addition to typing in a number, the Pitch correction factor, Tempo correction factor and Max peaks can be adjusted with the mouse wheel, or by using the Up and Down keys on the keyboard, or clicking the little arrows.
Pitch correction factor
Multiply all frequencies in the audio by this number.
Adjusting this for already analyzed audio will cause “ghost needles” to appear in the Display’s discrepancy meters until you apply the change. This is to visually show you how big of a pitch change you’re making, and let you know when you’ve made enough of a correction to center the needles.
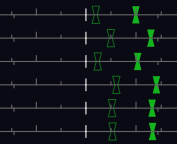
Ghosts!
Tempo correction factor
The tempo correction factor to apply to the audio.
Note
Pitch and tempo correction factors have a range of 0.243 to 4.117. This covers 4 octaves plus another 50 cents on either end of the range.
This should be more than enough for any normal corrections, but if you do need more for whatever reason, make a bug report to let me know. See Where is the bug tracker?
Link button
Toggles the link between the pitch and tempo corrections.
The default is linked, which means they will always have the same value. Adjusting one will adjust the other one along with it so they stay the same. This is like adjusting the tape speed on a tape player, with pitch and tempo changing together.
Unlink them to adjust pitch and tempo independently.
Note
The Link setting is not saved when you save options. Instead, the correct setting is guessed during the saved option loading process. If pitch and tempo are different, Link will be off, otherwise it will be on.
Changed in version 0.8: Link used to be off by default.
Changed in version 0.11.2: Link didn’t used to automatically update
Changed in version 0.12: Items in the Analyzed Audio Panel now store their Link setting, to avoid having to guess when selecting analyzed audio. Guessing the Link setting still happens when loading saved options, however.
-100c button
+100c button
These change the pitch correction factor by 100 cents. This is equivalent to one half-step in the 12 Tone Equal Temperament tuning system. In other words, these buttons change the key.
Keyboard shortcuts:
< = -100c
> = +100c
(That’s Shift+, and Shift+. on a US English keyboard.)
Reread file with correction
Normally when a pitch correction is applied, the display doesn’t show the actual result of the pitch correction calculation. Instead, it fakes it by just applying an offset to all the measured frequency values. This is usually good enough, but sometimes you want more accuracy than that.
Pushing Reread file with correction instead of Apply to selected forces a reread of the file with pitch correction applied and a complete reanalysis, so you can see what the result of the pitch shift really is.
This matters because the pitch shift algorithm isn’t perfect, and will cause subtle changes that make the frequency analysis come out differently.
Warning
If the pitch and tempo correction factors are different, this can be very computationally expensive, especially when using the rubberband pitch correction backend. The worst part is that reading the file with pitch correction applied is not something that can be interrupted with the stop button.
Tuning system
Which tuning system to use. Right now there’s only 12 Tone Equal Temperament and Pythagorean, but future versions will have more tuning systems to cover a wider variety of music.
The default is Equal Temperament.
Reference frequency
The frequency of the Reference note, in Hz. Default is 440 Hz (Stuttgart pitch).
Reference note
The note to which the Reference pitch applies. Default A4 (The A above middle C). When typing in a note, you can use “#” (hash) as a sharp symbol and “b” (lowercase B) as a flat symbol.
Low cut
Don’t show pitches below this frequency. Default is 20 Hz.
High cut
Don’t show pitches above this frequency. Default is 15000 Hz.
Start time
End time
These control which part of the audio gets analyzed. By default, it analyzes the whole thing, from Beginning to End. Set different times here to narrow that down to a specific part.
If Option ‣ Play between Start time and End time is checked, this will also control which portion of the audio the player plays.
Times can be specified as a number of seconds, or in mm:ss or hh:mm:ss format. It doesn’t have to be an integer number of seconds; decimal points are allowed. Negative times are relative to the end of the audio (for example, -5 means 5 seconds before the end). Percentages are also allowed (for example. 50% means halfway through).
The special value “Beginning” is allowed for the start time, and the special value “End” is allowed for the end time. They mean exactly what you think they do.
If the audio is loaded in the player, you can use the Set to now buttons to set the Start time or End time to the current play position.
dB range
Controls the sensitivity of spectral peak detection. Any peak in the spectrum this much weaker than the most prominent peak will be ignored. The default is 30 dB. Set it higher if not enough pitches are being detected.
Max peaks
The maximum number of pitches to show. The default is 10.
Saving Options
Added in version 0.11.
Once you’re happy with the options you’ve set for a particular audio file, you can save them by pressing Ctrl+S or using the File ‣ Save options menu item. The next time you analyze that file, it will use the saved options (unless of course Use in next analysis is checked, in which case it will use whatever options are set in the Option Panel instead).
If you’re made changes to the options for a particular file, you can reload the saved ones into the Option Panel using File ‣ Reload saved options. Don’t forget to push Apply to selected if you want the options applied.
There’s also File ‣ Delete saved options, which will delete the saved options associated with the currently selected analyzed audio after asking for confirmation.
The options are saved in a file called saved_options.ini by default. It’s
location on your system is given in the About window (Help ‣
About Audio Tuner).
See Save File.
Attention
The saved options are stored by path, so if the audio file is renamed or
moved, Audio Tuner won’t recognize it as the same file unless
saved_options.ini is manually updated. A future version may have the
option to identify files by hashes instead of paths.
Warning
Saving options from multiple instances of the Audio Tuner GUI running at the same time results in undefined behavior. It is very likely you’ll lose some of the saved options. Don’t do this.
Analyzed Audio Panel
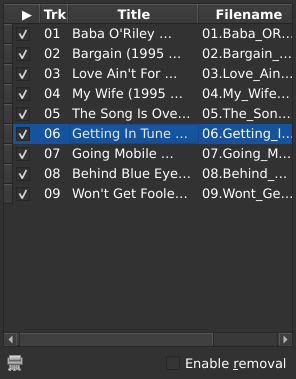
This is a list of audio files that have been analyzed. Whichever one is selected will show up on the Display, and will be the one that plays when you push the play button.
You can edit the titles. This will not change the title tag in the original file (Audio Tuner will never modify or overwrite the original file). It will affect the title tag as it appears in the Export Window’s tag editor.
Tip
If you set the title to a blank value, it will revert to the original title.
Tip
You can rearrange things by dragging the small boxes on the left side of the list.
Remove button
Removes the currently selected analyzed audio from the list. It only works if Enable removal is checked, to prevent accidental removal.
Enable removal
Makes the remove button work.
Playlist
Added in version 0.12.
The column with the play symbol ( ▶ ) at the top is the playlist column. This affects what gets played when you push the play button in the Toolbar. You can add items to the playlist by checking their checkboxes in this column, and remove them from the playlist by unchecking their checkboxes.
If you push the play button in the toolbar with nothing checked, it will play the currently selected item and then stop.
Note
The player should smoothly go from one song to the next in the playlist with no gap. However, this doesn’t work when using the rubberband pitch correction backend. If you need gapless playback, only use the default scaletempo2 backend.
Message Log
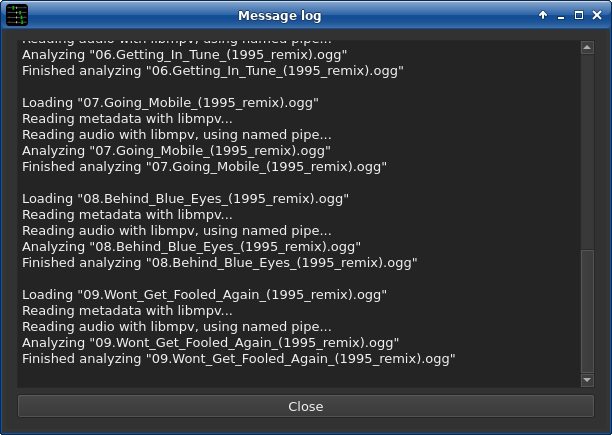
This is a log of what’s happened since Audio Tuner started (or since the last time the log was cleared). Warnings are bold and errors are red.
Right-clicking brings up a context menu containing Copy, Select All and Clear log.
Export Window
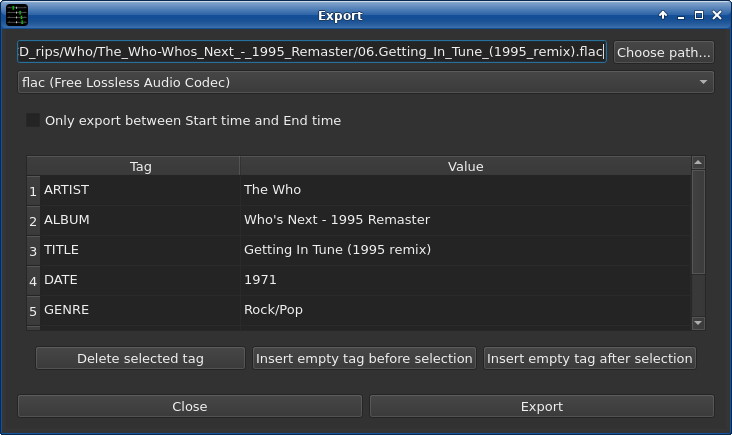
This allows you to export audio with the pitch and tempo correction applied.
Pick a path (directory and filename) either by typing it directly into the line edit box, or pushing the Choose path… button to open a standard file selector dialog window.
Pick a file format.
Choose whether or not you want to limit the export to between Start time and End time (as set in the Option Panel).
Edit the tags if you want.
Push Export.
The Export window closes when and if the export finishes successfully. Warnings and errors will show up the Message Log.
Note
Don’t try to overwrite a file that already exists. Audio Tuner won’t do it. It doesn’t matter if the file selector dialog asks you if you want to overwrite it and you say yes, it still won’t do it.
Note
If the tag editor is empty, it means the original file didn’t have any tags. If you want tags in the exported file, you’ll have to write them all yourself.
Note
Unlike with the Option Panel or Analyzed Audio Panel, setting a tag to an empty value will not reset it to it’s original value. However, you can undo all your changes by closing the export window and opening it again.
Keyboard cheat sheet
General commands:
Exit: Ctrl+Q
Toggle File Selector/Option Panel: F2
Message Log: Ctrl+E
File Selector Panel commands:
Show Hidden Files: Ctrl+H
Highlight Multiple: Ctrl
Highlight Contiguous: Shift
Select: Enter
Up: Alt+Up
Back: Alt+Left
Forward: Alt+Right
Home: Alt+Home
Option Panel commands:
Link: =
-100c: Shift+<
+100c: Shift+>
Hold: Alt+L
Use in next analysis: Alt+U
Revert to defaults: Alt+D
Apply to selected: Alt+A
Save options: Ctrl+S
Changed in version 0.11: Alt+L used to toggle Link
Analyzed Audio commands:
Toggle playlist checkbox: Insert
Cancel analysis: Esc
Remove from list: Backspace
Player commands:
Play: Ctrl+P
Pause: Spacebar
Previous entry in playlist: Shift+Left
Back 10 seconds Left
Forward 10 seconds Right
Next entry in playlist: Shift+Right
Play, Pause and Stop media keys will also work if your keyboard has them. A combination Play/Pause key will not work.
Changed in version 0.11: Ctrl+S used to stop the player